Setup and Transition Guide
Thank you for purchasing your new Statusfy service. This is a quick start guide to get you up and running in just a few minutes. Your Statusfy hotline phone number is activated and ready to use (unless you are using the Free plan), all you need to do is make a few decisions on how best to set up your account. Don’t worry, the system is completely flexible and can be changed as many times as you need to get it to work best for your organization. Print this guide and follow along as you set up your new account.
Account Settings
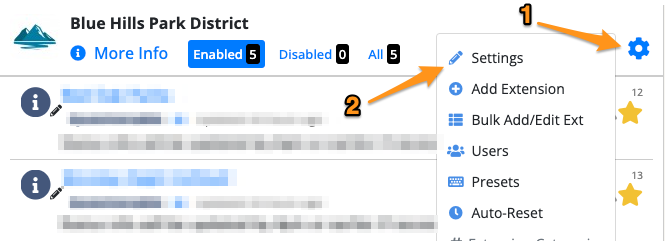
Your main account settings are where you set your organization name, primary address, time zone, and profile logo. You can access the settings from your organization's main page if you are signed in as a user that has the proper assigned permissions to be able to administer the account. If you have the proper permissions you will see a COG/Gear icon. Select the icon then select "Settings".
Determine Your Extensions
Your status information will be communicated as one or more extensions of your main account. Extensions save your patrons time by giving them the ability to view or listen to ONLY the status extensions they care about. It saves your staff time by allowing them to update only the status extensions that need updating. This results in status information that is much more up-to-date and quicker to access compared to recording a single status message covering multiple events/facilities.
Extension Examples
Different organizations may use extensions in different ways depending on their operations. Here are some examples to help you determine how you might best be able to use them.
- For Each Complex - Example: Westside Softball Complex
- For Each Field - Example: North Park Field 1
- Specific Sports – Branson Baseball, Branson Soccer
- Facility – Branson Community Center, Branson Aquatic Center Pool / Tennis Courts / Golf Course, etc
- Day – Men’s Monday Night Soccer
- Age/Class – Coed Softball, 12 and Under etc
- Service - Field Maintenance Crew
Note that your Rainout Line is to be used by your organization only. Extensions should not be used to provide the service to other organizations under your account.
For example, in Scenario A - Westside Soccer Complex consists of 4 soccer fields. Because it is very rare that any individual field has a different status, we are deciding to use a single extension for the entire complex. In the rare case that an individual field does have a different status, we will use the yellow "Notice" status and provide the complete status info for all fields in the status detail message of our update.
In Scenario B - Northside Baseball Complex consists of 8 fields and used for large tournaments. Frequently the start times for games are delayed on indivudal fields. We will setup a different extension for each field so that players can check the status of the field they are to be playing on. When all fields do have the same status, they can easily be set in bulk.
Extension Numbering
You can number your extensions from 1 to 999 but your service plan will limit how many extensions you can use. The numbering of your extensions affects how they will be announced on the dial in phone menu as it reads them from smallest to largest. You typically do not want to modify your extension numbering once your patrons have started using the system, but you can if necessary. You do not have to number extensions sequentially and can skip blocks of extension numbers for future usage. For example, you can start with extensions 10, 20, 30, and 40 if you think you may want to add additional extensions later but are not sure how you will want them ordered. This gives you more flexibility without having to renumber your initial extensions.
Adding Extensions
Adding extensions is easy from the main settings COG/Gear icon, to get started click the COG, then the + Add Extension option.
https://statusfy.com/images/1700107872_Dnis_%E2%80%A2_Statusfy.png
On the following screen you will have the option to set all of the details for the extension.
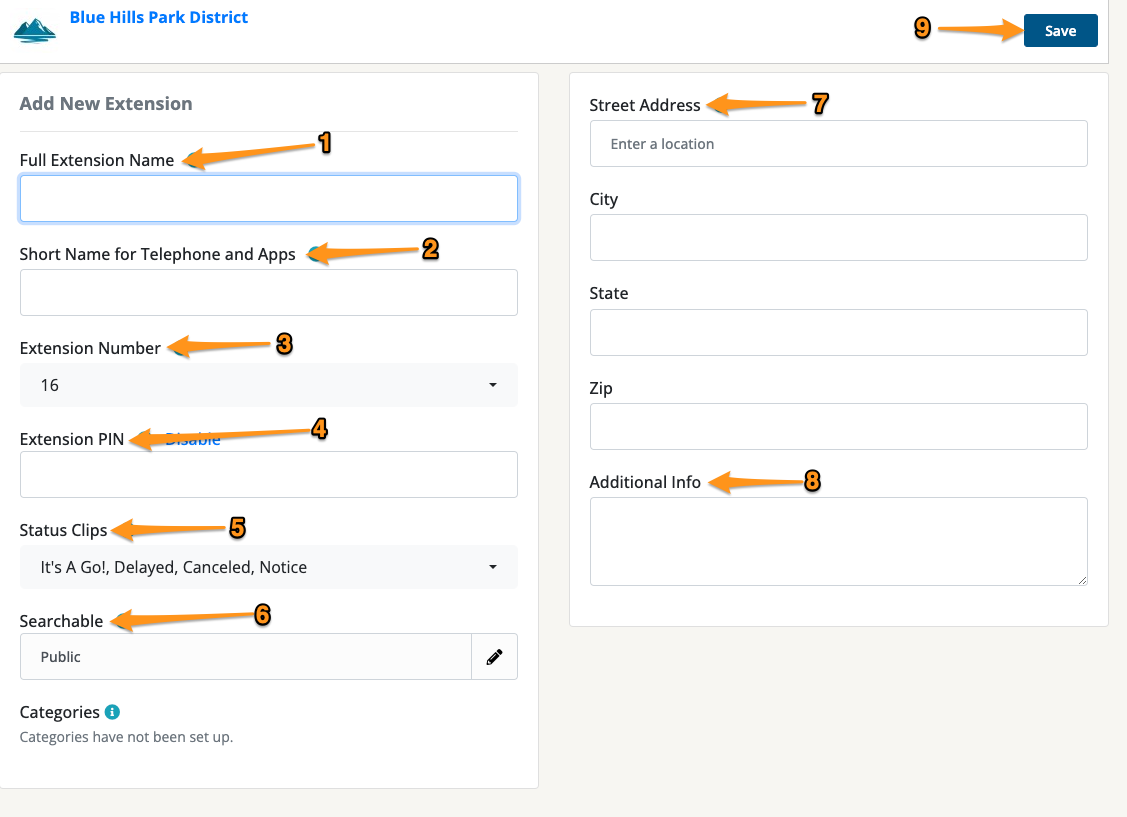
1) Extension Name: this is used on the website and when character restrictions do not prevent a longer name. An example would be something like "Monday Night Football"
2) Short Name: this is used for mobile apps, text messages and the telephone. select the full extension name used on the website as well as the short name which is used for the telephone and mobile apps. Using the example above, the short name may be something like "MNF".
3) Extension Number: The next available extension will be pre-selected, to change this simply use the dropdown to select another open extension. NOTE: in order to re-number extensions number you would like to use here, edit that extension, select any open number, then come back to this one and select the desired extension.
4) Extension PIN: Each Statusfy extension can be updated using a standard telephone line with the provided PIN, this feature can also be disabled if you do not plan to use it. NOTE: When updating from the dial-in telephone line the status update can be selected but the actual message will not show up as text on the website, mobile app, or messaging, it will simply redirect the user to the web version where they can listen to the update.
5) Status Clips: This is where you can select the type of status clip that is played for each of the four status settings. An example of how this might differ is where one extension may be setup for a specific event "Its A Go!" would be perfect where another extension might be used for the pool where an "Open" or "Closed" status may be more appropriate.
6) Searchable: By default all extensions setup on Statusfy are searchable, the goal after all is to get the message out, having said this, over the years we have had several requests for "hidden" extensions that may contain more private or sensitive information, this is one way to create a status message that can only be viewed by sharing the direct link to its status message, these are hidden from all search results.
7) Address (Street, City, State, Zip): Statusfy uses this information to help streamline delivery of status messages to those who are close by. This way if you open the mobile app or website and search "soccer" or "Swimming pool" instead of seeing every extension on the system with "soccer" you would only see results that are geographically close to you. Setting this will ensure that your participants can easily find the information they need as well as providing access to maps.
8) Additional Info: This is a free form field for you to use as you see fit. This field is text only but we have seen some very creative uses of this field. One Statusfy customer uses this to sell sponsorship spots "This extension sponsored by Mr. T's Pizza", others have used it to include information that may be helpful for participants trying to find the location "The parking lot is small but additional parking is available across the street at the church" type of messages.
9) Save: When you are done setting and selecting simply click the "Save" button in the upper right, you will see a banner that the extension was added/saved successfully and allow you to make any additional changes before clicking out.
Editing Extensions
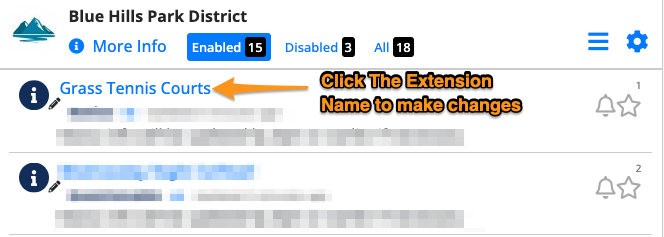
Editing existing extensions is done by first clicking on the extension name
This will take you to the extension detail page where you can click the COG/Gear icon to edit the extension:
directly.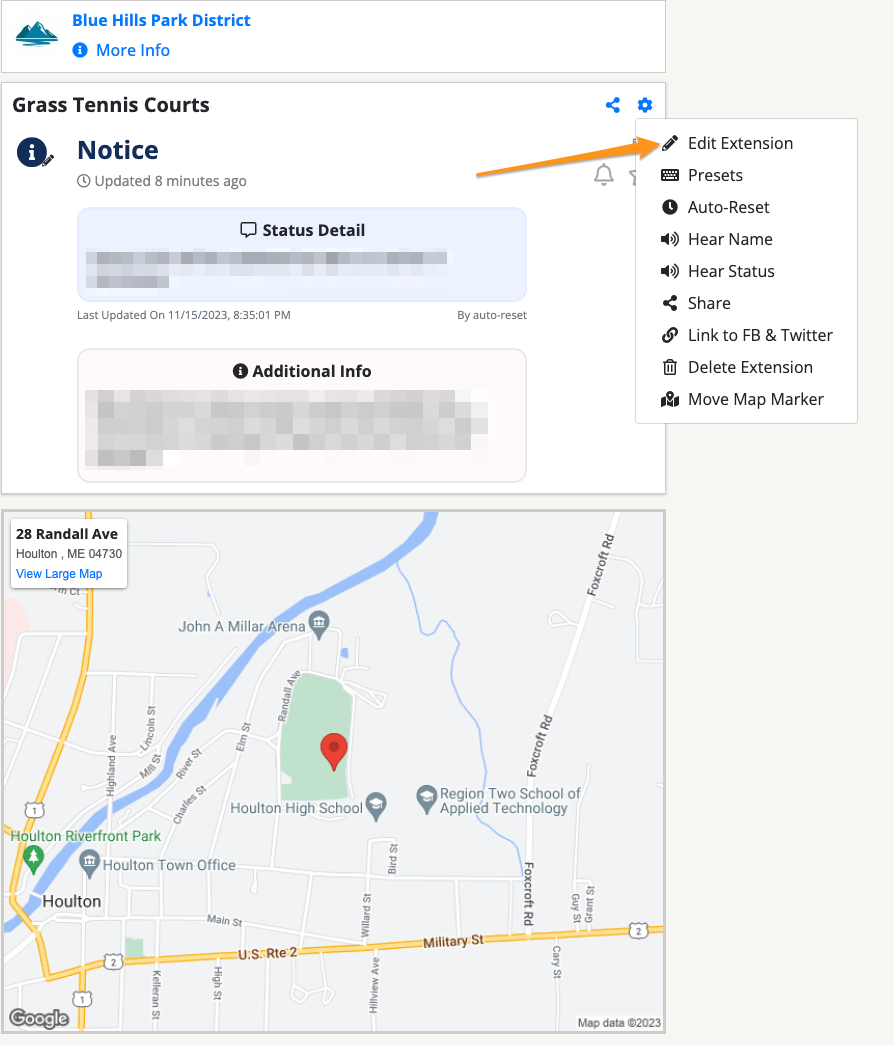
Once you select the "Edit Extension" option you will be presented with the page allowing you to change all of the information associated with this individual extension.
Deleting an Extension
Similarly to editing an extension, start by clicking on the name of the extension from the main page, then clicking on the small COG in the upper right corner simply select the "Delete Extension" option.
Bulk Extension Editor
To streamline the process of making updates to more than one extension at a time, please use the bulk Add/Edit tool. Selecting the COG, then Bulk Add/Edit will take you to the bulk editing dashboard where you will be able to quickly add or edit many extensions at once.

Bulk Add/Edit page
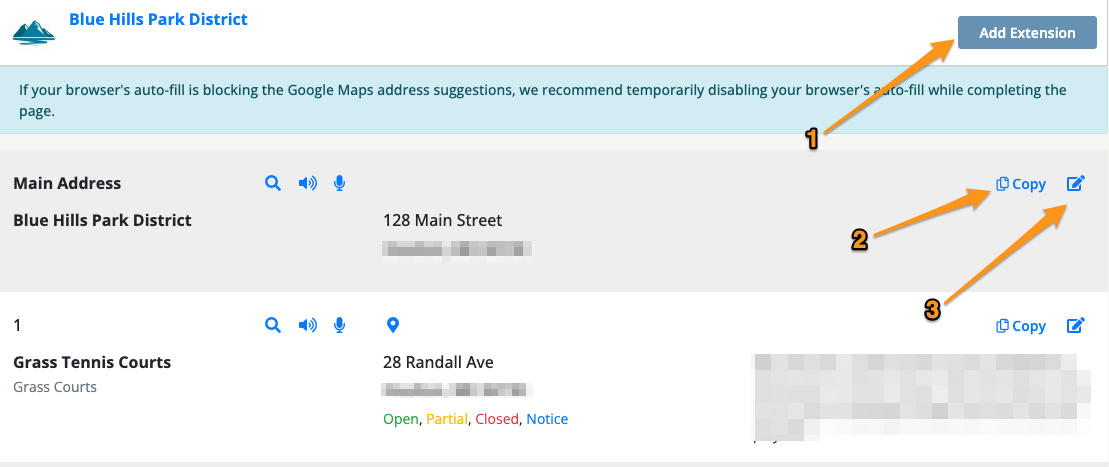
1) Add Extension: quickly add a single extension from this button
2) Copy: This allows you to copy the details of any extension to be pasted to one or more others. Once "copy" is clicked, you will have the option of which fields to copy and then which extensions to paste it to.
3) Single edit: this will allow you to quickly edit the details of any single extension on this page.
Created: July 14, 2023
Last updated: 30+ days ago by Stephen Bickle